12 March, 2016

Types of photographic filters.

Types of photographic filters.

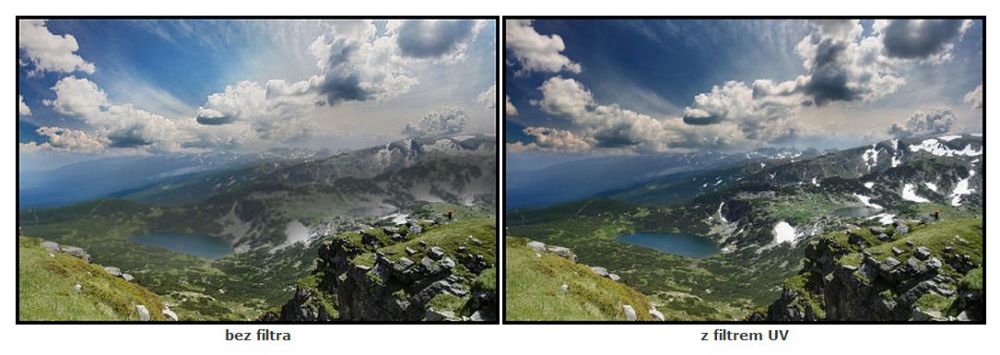
Filtr ultrafioletowy Blokuje promienie ultrafioletowe. Jest przydatny górach oraz przy zdjęciach robionych na bardzo dużej wysokości. Filtry te mogą wywołać spadek kontrastu w fotografii analogowe. Natomiast w fotografii cyfrowej spadek ten jest praktycznie niezauważalny. Filtr ultrafioletowy jest stosowany bardzo często, ponieważ pozwala zabezpieczyć przednią soczewkę obiektywu przed uszkodzeniem. 

Ultraviolet filter blocks ultraviolet rays. It is useful for the mountains, and when taking pictures at a very high altitude. These filters can cause a decrease in contrast to analog photography. However, in digital photography, this decrease is practically imperceptible. UV filter is used very often, because it allows you to protect the front lens of the lens from damage.


Filtr skylight Filtr ultrafioletowy z bardzo podobnymi cechami różniący się tylko tym, że oprócz zatrzymania promieni ultrafioletowych delikatnie ociepla nasze zdjęcie.

Skylight filter UV filter with very similar features differ only in that in addition to stop ultraviolet rays gently warms our picture.


Filtr polaryzacyjny W efekcie pozwala z wyeliminować odblaski oraz część światła odbitego na naszym zdjęciu. Używając tego filtra możemy sfotografować dno jeziora, będą widoczne kamienie oraz cała powierzchnia Możemy również sfotografować osobę za oknem nie martwiąc się o odblask  refleksy na szybie. Filtry polaryzacyjne wyposażone są w ruchomą część, która umożliwia regulację polaryzacji. Filtry te zatrzymują od 30% do 70% światła docierającego do obiektywu. Czyli musimy dobrać odpowiednią korektę ekspozycji. Możliwości tego filtra nie da się zastąpić obróbką cyfrową.

As a result, a polarizing filter can eliminate the glare and part of the reflected light in our photo. By using this filter we can photograph the bottom of the lake, will be visible stones and the whole surface can also shoot someone through the window without worrying about glare reflections on the glass. Polarizing filters are equipped with a movable part that allows you to adjust polarity. These filters retain 30% to 70% of light reaching the lens. So we need to choose the appropriate adjustment of the exposure. The possibilities of this filter can not be replaced by digital processing.


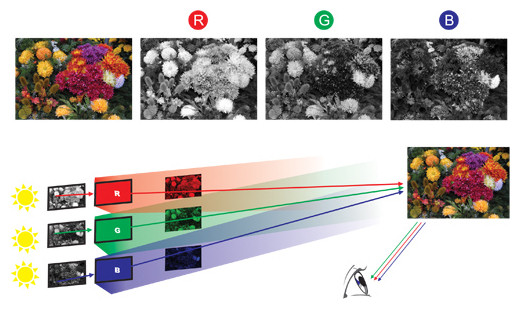
Filtry barwne Do fotografii czarno-białej, najczęściej stosowane w aparatach analogowych podczas fotografowania oraz filmowania czarno-białych scenerii. Występują w różnej gamie kolorów między innymi: zielony, niebieski, żółty, czerwony. Każdy z nich charakteryzuje się innym stopniem przepuszczalności kolorów, na przykład zastosowanie filtra czerwonego spowoduje spadek jasności elementów niebieskich i zielonych na zdjęciu a wzrost jasności obszarów czerwonych.

Color filters to the black-and-white, mostly used in analogue cameras while shooting and shooting black-and-white scenery. They come in different range of colors include: green, blue, yellow, red. Each of them has a different degree of permeability of color, for example, the use of the red filter will decrease the brightness of the elements of blue and green in the picture and increase the brightness of the red areas.


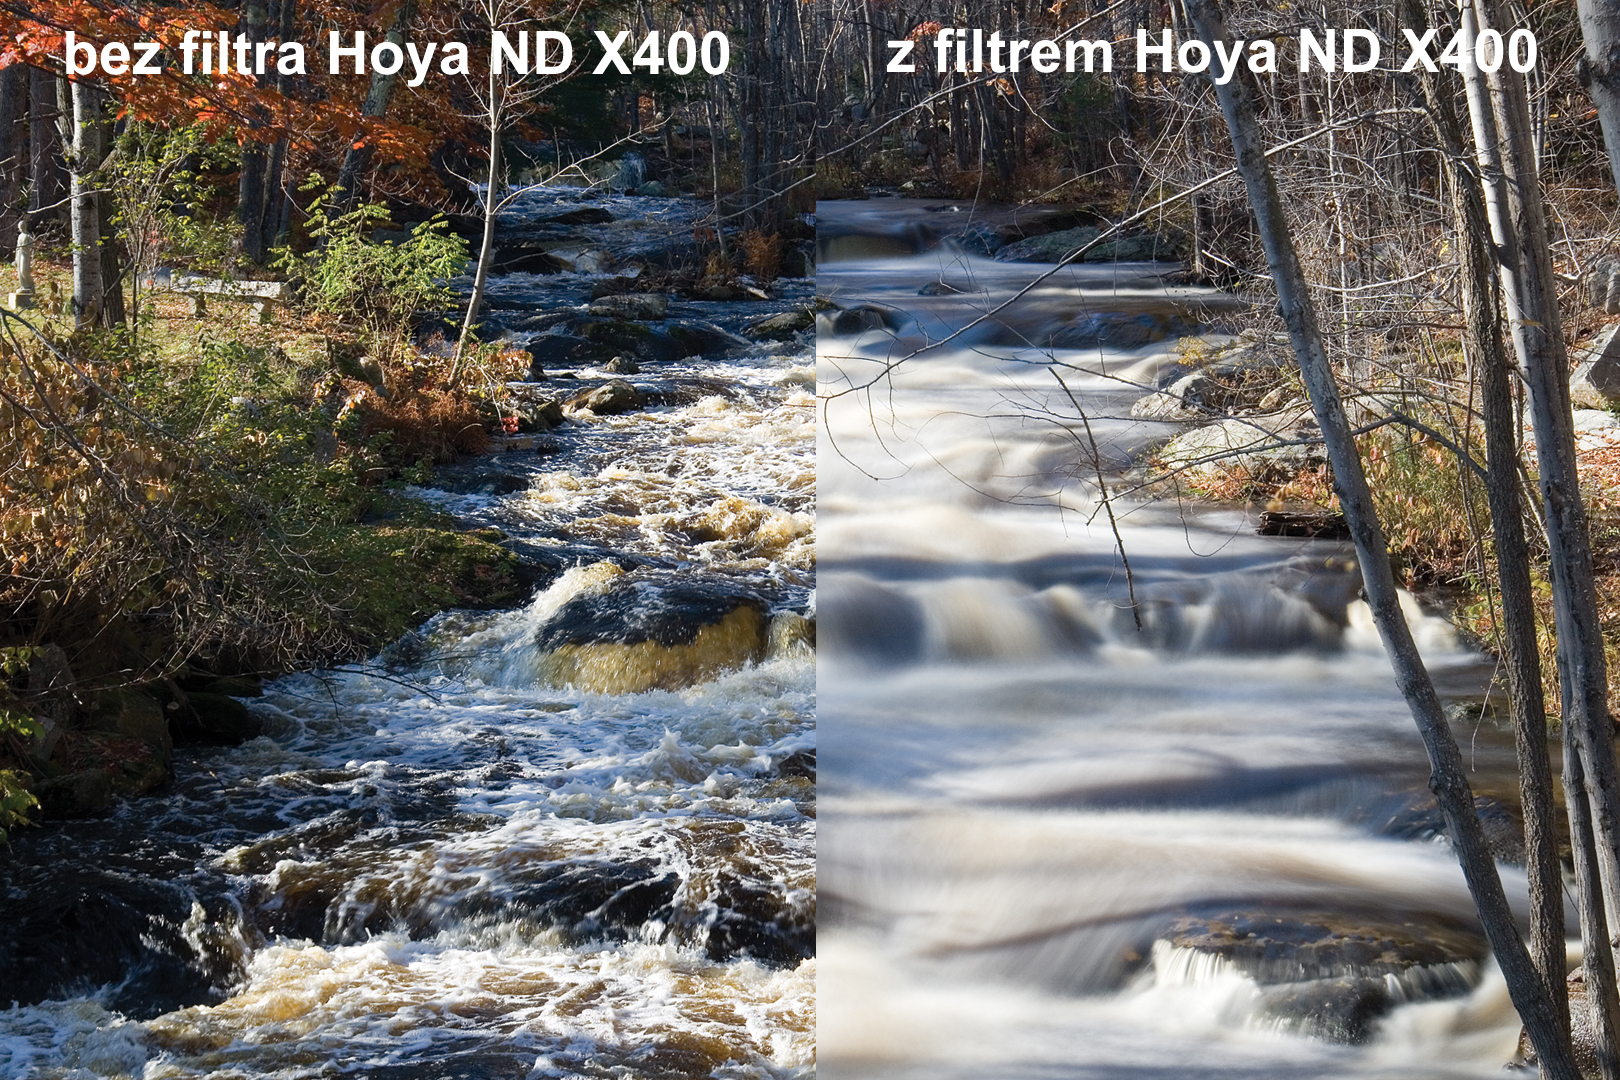
Filtry neutralne szare (ND) Zatrzymują cześć światła, nie wpływają jednocześnie na jego barwę ani nasycenie. Pozwalają nam na zastosowanie dłuższej ekspozycji, nie musimy zmieniać przysłony ani czułości ISO. Filtry te występują w różnych wersjach i o różnych stopniach przyciemnienia. Im wyższy stopień, tym dłuższa ekspozycja. Filtry te przydają się w sytuacjach, gdy chcemy sfotografować ruch wody, chcemy żeby woda była rozmyta. Filtry te pomagają uzyskać bardzo długie czasy naświetlania nie osiągalne w żaden inny sposób. Często używa się go do fotografii wodospadów oraz fal morskich.

Filters neutral density (ND) Stop honor of the light at the same time not affect the hue or saturation. They allow us to use longer exposure, do not have to change the aperture or ISO sensitivity. These filters are in different versions and with different degrees of dimming. The higher the grade, the longer exposure. These filters are useful in situations when you want to photograph the movement of water, we want the water was fuzzy. These filters help you get a very long exposure times not achievable in any other way. Often it is used for photographs of waterfalls and waves.


Filtry połówkowe W tych filtrach efekt ograniczony jest do połowy powierzchni. Występują w rozmaitych typach często stosuje się filtry połówkowe neutralne szare żeby przyciemnić niebo. Pomagają one uzyskać efekt ciemniejszego nieba przez to nasze zdjęcie nie będzie prześwietlone. Pozwalają osiągać dwie różne ekspozycje dla osobnych obszarów zdjęcia.

The half-filter effect of the filters is restricted to half the surface area. They come in a variety of types is often used filters half-neutral gray to darken the sky. They help you get the effect of a darker sky by then our picture will be overexposed. They allow you to achieve two different exhibitions for separate areas of the image.


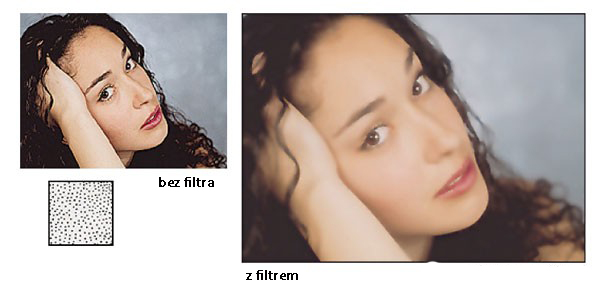
Filtry efektowe Dzielimy je na filtry: gwiazdkowe i zmiękczające. Filtry gwiazdkowe charakteryzują się tym, że jeżeli robimy nocne zdjęcia to źródło światła zamienia się w efekty gwiazdy, na przykład lampa będzie miała efektu gwiazdy. Filtry zmiękczające które powodują powstanie lekkiej poświaty w okolicy jasnych obszarów zdjęcia i ogólny spadek ostrości. Jest bardzo przydatnym filtrem w fotografii portretowej, jeżeli chcemy uzyskać piękny i aksamitny oraz delikatny kadr.

Effect filters divide them into filters: Star and softening. Filters star characterized by the fact that if we nighttime images this light source becomes a star effects, for example, the lamp will have the effect of a star. Softening filters that give rise to a slight glow around bright areas of the image and the overall decline in focus. It is a very useful filter in portrait, if you want to get a beautiful and velvety and delicate frame.


06 March, 2016

Shooting modes in digital cameras (M, A, P, S)

Shooting modes in digital cameras (M, A, P, S)

W aparata w cyfrowych wyróżniamy cztery podstawowe tryby fotografowania. (M,A,P,S) Zapewne każdy z nas zastanawiał się który z nich jest dla niego najlepszy oraz który tryb trzeba używać przy odpowiednich sytuacjach.

In the digital camera we can distinguish four basic shooting modes. (M, A, P, S) Probably each of us wondered which one is the best for him, and which mode you have to use the appropriate situations.


Typ P - litera która go oznacza wywodzi się z nazwy program lub programowa automatyka. W tym trybie aparat działa bardzo podobnie tak jak w trybie automatycznym, ponieważ sam dobiera potrzebny czas naświetlania oraz przysłonę. Różnica między trybem automatycznym a trybem program jest taka, że w trybie program możemy zmieniać istniejące proporcje pomiędzy czasem a przesłoną. Trzeba jednak pamiętać żeby nasze zdjęcie było idealnie doświetlone, czyli tak zwana poprawna ekspozycja zdjęcia. Musimy ustawić dokładnie 3 parametry: czas, przysłonę oraz czułość ISO. W trybie program możemy uzyskać piękne rozmycie tła jeśli otworzymy przysłonę bardzo szeroko a zarazem zmniejszymy czas naświetlania, czyli przez otwór przysłony padać będzie więcej światła ale zdjęcie będzie naświetlane o wiele krócej. Tryb ten nie wymaga dużej wiedzy Jeżeli chcemy go zastosować pamiętajmy żeby przed zrobieniem zdjęcia zastanowić się nad odpowiednimi ustawieniami. 

Tryb A - tryb ten oznacza priorytet przysłony. tSami ustawiamy przysłonę, która nas interesuje aparat dobiera do niej resztę ustawień. Tryb pozwala na pełną kontrolę nad głębia ostrości jak i również nad stopniem rozmycia planu. Często używamy go do wykonywania portretów. Jeśli chcemy mieć pięknie rozmyte tło, ustawiamy przysłonę na przykład na wartość f /1.8 a aparat sam dobierze resztę parametrów tak, aby nasze zdjęcie było odpowiednio doświetlone. Natomiast gdy fotografujemy krajobrazy bądź architekturę ustawiamy przysłonę między f/16 a f/22 jeśli chcemy mieć wszystkie elementy ostre. Program A  nie daje nam żadnej kontroli nad czasem naświetlania, więc jeśli przysłonę dobierzemy zbyt małą nasze zdjęcie może zostać rozmyte. Używanie trybu wymaga pewnej wprawy oraz przewidywania efektów.

Tryb S - Specjalistyczny tryb od szybkości. W trybie S możemy kontrolować czas. Zupełnie odwrotnie niż w przypadku trybu A .Nazwa wywodzi się od angielskiego słowa ''Shutter''czas otwarcia migawki. W tym trybie ustawiamy czas naświetlania a aparat dobiera resztę parametrów . Pamiętajmy że krótkie czasy oznaczają zamrożenie ruchu natomiast długie pozwalają ukazać ruch i dynamikę: na przykład jazdę samochodu. Dynamika na zdjęciu może nam się przydać również gdy fotografujemy górski potok ewentualnie fale morskie. W takich sytuacjach powinniśmy korzystać ze statywu jeżeli chcemy uzyskać poruszanie samej wody a nie całego kadru tryb S wykorzystywany  jest w fotografii sportowej kiedy fotograf boi się używać w pełni manualnego trybu M. Tryb  daje całkowitą kontrolę nad czasem ale nie nad wartością przysłony czyli rozmyciem. 

Tryb M - jak sama nazwa wskazuje tryb manualny. Nie jest przeznaczony dla początkujących fotografów. Sami ustawiamy wszelkie parametry: przysłonę, czas oraz ISO. Automatyka aparatu nie ma tutaj żadnego wpływu na parametry zdjęcia, więc każde źle wykonane zdjęcie jest winą osoby która je robiła. Często aparat informuje nas czy na danych ustawieniach zdjęcie będzie prześwietlone czy niedoświetlone (światłomierz). Trzeba jednak pamiętać, że przy zmiennych warunkach oświetleniowych bardzo trudno jest na bieżąco poprawiać parametry. Przed wykonaniem fotografii powinniśmy sprawdzić czy zdjęcie na pewno będzie dobrze wyglądało należy wówczas wykonać zdjęcia testowe. Tryb M ma zastosowanie w fotografii studyjnej gdzie oświetlenie nie zmienia się zbyt szybko, czyli warunki oświetleniowe są dla nas stałe i nie zmienne.


Type P - the letter that it is derived from the name of a program or software automation. In this mode, the camera works very similarly as in automatic mode, because it selects the necessary shutter speed and aperture. The difference between automatic mode and the program is that the program mode, you can change the existing balance between time and iris. But keep in mind that our hotel was perfectly lit, the so-called correct exposure image. We must set exactly 3 parameters: time, aperture, and ISO. During the program, we get a beautiful background blur if you open the aperture very wide and at the same time will reduce the exposure time, ie the aperture will fall more light but the picture will be explained with much shorter. This mode does not require much knowledge if we want to apply it to remember before shooting to consider the appropriate settings.

A mode - This mode is aperture priority. tSami set the aperture, we are interested in the camera adjusts to the rest of the settings. Mode allows full control over depth of field as well as on the degree of blurring of the plan. We often use it for portraits. If we want to have a beautifully blurred background, set the aperture, for example, the value of f /1.8 and the camera itself selects the rest of the parameters so that our image was properly lighted. In contrast, when shooting landscapes or architecture set the aperture between f / 16 and f / 22 if you want to have all the elements sharp. A program does not give us any control over exposure time, so if we choose too small aperture our picture may be blurred. Using requires some practice and predicting outcomes.

Mode S - Specialist mode of speed. In S mode, we can control time. Quite in contrast to the mode A .Nazwa derives from the English word '' Shutter''czas shutter speed. In this mode, you set the shutter speed and the camera selects the rest of the parameters. Let us remember that the short times mean freeze motion while long allow to show movement and dynamics: for example driving a car. The dynamics of the picture may be useful to us also when photographing mountain stream or ocean waves. In such situations, we should use a tripod if you want to get the movement of the water itself and not the entire frame mode S is used in sports photography where the photographer is afraid to use full manual mode M. Mode gives you total control over time but not over the aperture or defocusing.


M mode - as the name indicates manual mode. It is not intended for novice photographers. Sami set any parameters: aperture, time and ISO. Automatic camera is not here no effect on the images, so every wrong picture taken is the fault of the person who did it. Often the camera tells you if the data settings picture will be overexposed or underexposed (meter). But keep in mind that with variable lighting conditions it is very difficult to keep correct parameters. Before shooting should check whether the image will certainly look good then you must perform test shots. M-Mode is used in studio photography where the lighting does not change too quickly, or lighting conditions for us are fixed and not variable.

03 March, 2016

How to photograph auroras? Advice and Tips.

Fotografowanie zorzy polarnej jest dosc proste. Udane zdjecie zalezy od wielu czynnikow. Powinnismy pamietac o kilku prostych rzeczach:
• Im ciemniej tym lepiej. Nalezy udac sie jak najdalej od miasta, wiosek, i jakiegokolwiek swiatla, ktore moze zepsuc nasz kadr.
•Snieg ktory rozswietla nasz kadr, powinnismy dostosowac odpowiedni czas naswietlania.
• Nie powinnismy fotografowac podczas pelni ksiezyca, oraz gdy jego blask moze nam popsuc kadr. Zamiast czarnego nieba dostaniemy szare.
 •Powinnismy wybrac odpowiednie miejsce. Gdzie mozemy zrobic szeroki kadr.
•Powinnismy uzywac obiektywu szerokatnego.
•Wrzesien-Listopad oraz Marzec-Kwiecien to najlepsze miesiace na zobaczenie zorzy.
•Powinnismy pamietac o wlaczeniu redukcji szumow w aparacie.
•Dlugosc naswietlania zalezy od oswietlenia otoczenia, wiec powinnismy sami dostosowac odpowiedni czas.
•Nie zapomnijcie cieplo sie ubrac :)  


Shooting aurora borealis is quite simple. Successful photo depends on many factors. We should remember a few simple things:

The darker the better. You must go away from the city, villages, and any light that will destroy our human resources.
• Snow who shines in our human resources, we should adjust the aperture and shutter speed.
We should not be photographed during a full moon, and if his brilliance can spoil our personnel. Instead, we get a black sky gray.
  We should choose the right place. Where we can do a wide frame.
We should use a lens with a wide angle of view.
September-November and March-April are the best months to see the aurora.
We should not forget to enable noise reduction on the camera.
Length of exposure depends on the ambient lighting, so we should adapt ourselves right time.
• Do not forget to wrap up :)